Sidechaining is a versatile technique that comes in handy in all kinds of audio situations. It’s sometimes seen as a more advanced skill, and understanding the gritty details is challenging. It’s not hard to begin using sidechaining though, and getting to grips with the technique will enhance your audio production no end.

Whether you’re creating EDM tracks, mixing your band’s album, or putting a podcast together, when you use sidechaining properly you’ll produce audio that sounds clearer, more balanced, and much more professional.
The video
What is sidechaining?
Sidechaining is a powerful way to improve the sound of your audio – whether your own compositions, mixes, or podcasts. Put simply, it involves using a compressor to automatically lower the volume of one sound in response to another sound. When we temporarily lower the volume of a sound like this, it’s called ducking.
You probably hear examples of sidechaining every day. When a radio DJ speaks and the music volume drops so the audience can hear them, that’s sidechaining. When the DJ speaks, the sound automatically triggers the volume of the music to duck. The technique is also used in music production to make certain sounds like kick drums “pop,” or to make vocals stand out more clearly.
OK, but what is a compressor?
We’re not going to get too technical here, but to use sidechaining effectively it helps to understand what a compressor does. Compression was developed in the 1930s and 40s to balance the volume of TV presenters’ voices and audience clapping with other sounds. These were analog units, and it wasn’t until the 1980s and 90s that compressors became a standard part of DAW software.
Compressors reduce the dynamic range between the different parts of an audio track. That means they make the loudest parts of the track a little quieter and the quietest parts a little louder. The dynamic range is the difference between the loudest and the quietest parts of an audio signal. Various controls allow us to alter the amount of compression across several parameters – attack, gain, knee, output, ratio, release, and threshold.
So, why should I use sidechaining?
When there are several things going on at once in an audio track, things can get messy. Sidechaining allows you to “tidy up” sections of your audio to achieve a neater, more cohesive sound. When you want to stop one part of your mix from being overwhelmed by another, sidechaining could be the answer.
Some common applications for sidechaining in music production include:
- Enhancing the clarity of vocals
- Lowering the volume of snares
- Making bass sounds pulsate
- Balancing kick, bass, and other elements
How can I sidechain in Logic Pro?
Each DAW works differently, but these days you can do pretty much the same things in each of them. Here, we’ll look at how to sidechain in Apple’s flagship DAW, Logic Pro X.
1. Load your samples
Begin by loading the samples that you want to sidechain into your Logic Pro workspace. You’ll see them represented as waveforms, one above the other. Listen to your samples to make sure you’ve loaded the correct ones and that everything sounds good.
In our video, you can see we have a drum sample on the bottom with a synth sample above. We’re going to sidechain our synth sample to the drum sample so that the synth ducks when the drums hit and the drums really pop.
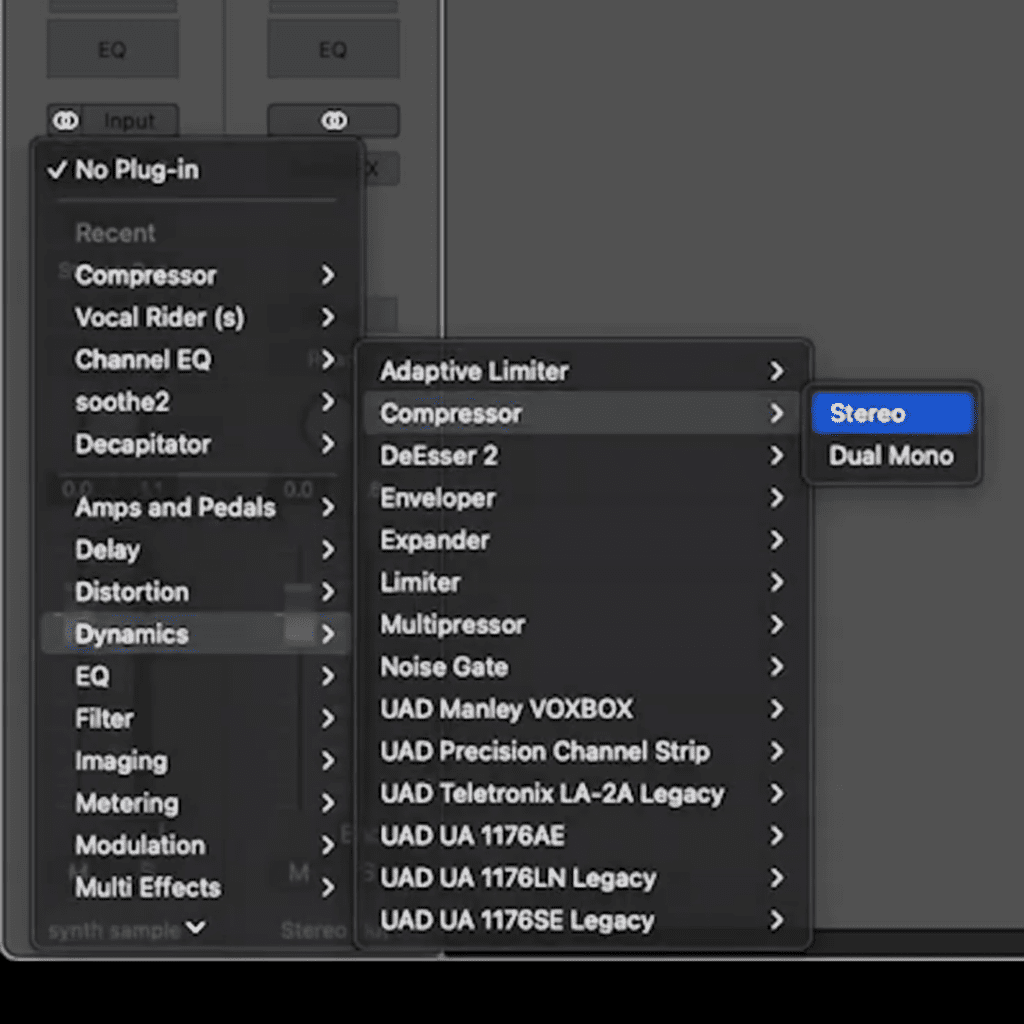
2. Use the compressor to apply the sidechain effect
Next, go to the first sample that you are going to sidechain – in our case the synth – open audio effects and choose the dynamics compressor. Now, open the sidechain dropbox in the top right of the compressor window and choose the sample you want to sidechain your first sample to – that’s the drum sample in our case.
3. Choose the amount of compression
Now you can use the dials to choose how much compression you want to apply. Experiment with the sound until you find a balance that works for you and the track you’re mixing. You can also use the auto function to automatically choose the compression levels. Once you’ve found the perfect level of compression, you’re all done!
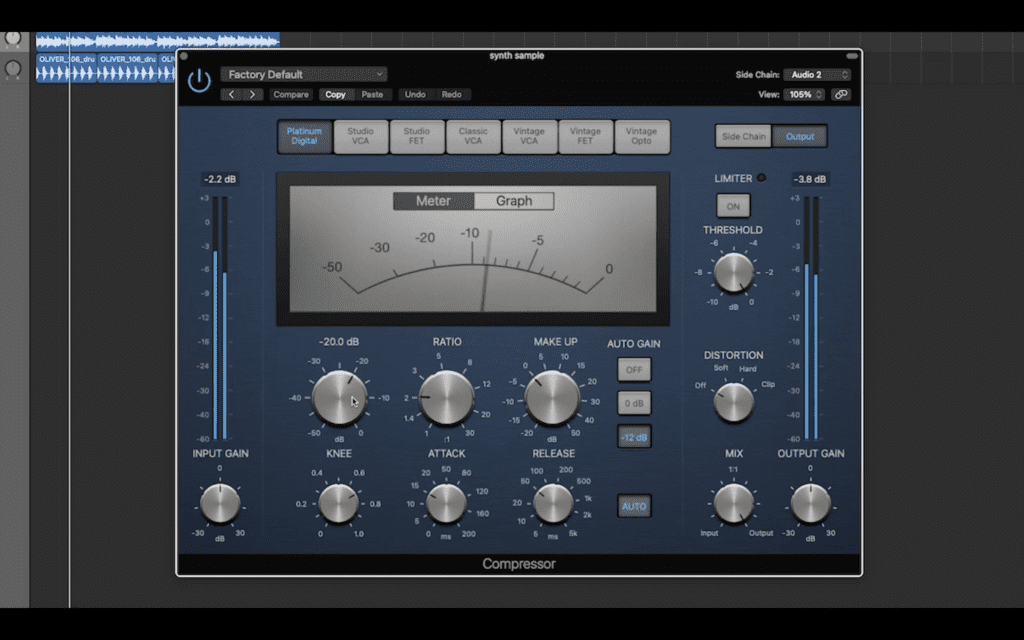
Use the power button in the top left of the compressor to switch the sidechaining on and off and compare the sound.
It’s that simple! Now you understand how to use sidechaining within your tracks, you’ll be able to experiment with it in many different audio situations and produce music that sounds balanced and professional. Have fun!
Related content
See our Youtube channel for more helpful content