There are a few things that should be sacred for every guitarist. One of them is to know when, and how to restring your guitar. Not knowing when to tune your guitar, or tuning your guitar incorrectly is one of the basic fundamental mistakes a beginner guitarist can make.
Others include “how to polish your guitar” and “how to run from your landlord after being too loud”. However, for the sake of this article – we will focus on restringing a steel string guitar.
Step 1 – Let’s Get Started
First, get a new string that you want to replace your current one with. Normally you would want to change all of your strings but ultimately it is up to you.
Then, find a nice, level surface with plenty of space to work on. You don’t want your guitar to be scratched or scuffed, so putting down something soft like a piece of cloth should protect your guitar.
Also, try to keep the top of your guitar in a stable position. You should find support for it as well. So that when you change strings, the guitar will be steady and stay in one place.
Step 2 – Remove strings
Now we need to detach the strings from the guitar.
Relax the string at the head of the guitar, also known as the tuner – until it is completely unwound. Then, gently pull the string from the hole. Tools such as string winders will help to accelerate this process significantly.

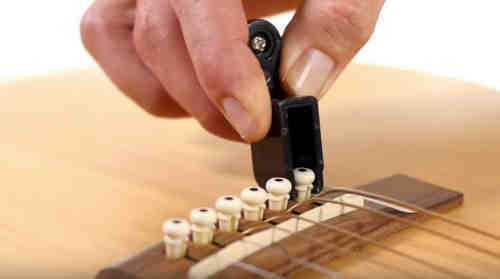
Look down the length of your guitar and you will find a lifted portion – called the bridge. This has pins attached to it; which hold the strings. Simply pull these pins and pull up the strings.
If you feel like you can’t pull the pin out. Then you may use a plier or scissors to pull them. However, this might damage the pins, therefore I would recommend getting a pin removal for this case.
Step 3 – Optional Cleanup
Normally, this is the best time to give your guitar a little maintenance. Clean the body of the guitar along with its fretboard.
Check our article on giving your guitar a thorough cleanup here:

Step 4 – Insert The New Strings
Remove and unroll your new strings from its package.
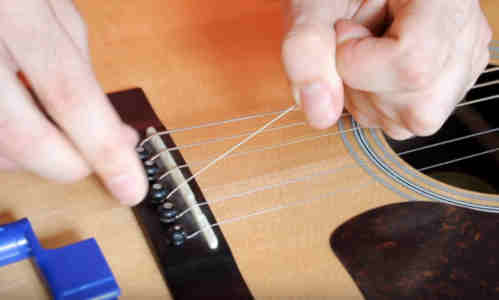
Place the pin of the bridge loosely. You want the string to easily get inside it. Then gently place the string ball inside it.
Then, press the pin gently down, while pulling up the strings at the same time.
Step 5 – Some Additional Work
Make sure that the hole in the tuning post faces the bridge at the headstock of the guitar. Then make sure that the string goes up through the hole. Leaving a decent amount of string to be wounded on the tuning post is a good idea.
A good method to do this is to pull the string off and then use your fingers to insert some extra string length.
Step 6 – Securing The Turning Post
Then, take the additional string – which should be poking through the tuner. And pull it inwards. You should do this by force if needed, as the string needs to be tight at the end.
Now, this should leave the strings strong with almost no room for movement.
Step 7 – Wind It
Hold the string near the nut of the guitar, and place the string in its designated slot. Make sure there is tension in the string at the tuning post. Then simply rotate the tuner while ensuring that the string goes from inside out.
Do this until the string is tight.
Step 8 – Tune The Way You Like It
Now, you are ready to tune the string to your desired tone. Once you are satisfied with the sound the string makes, you can cut the additional string from the tuning place.
Step 9 – Go Back To Step 1
Now, you must follow these steps with each and every string. After this, you will be done with tuning.
How often should you tune your guitar?
It depends upon how much you play. However, as a beginners golden rule, you may change the strings of your guitar after 100 days or when you feel that that they have gone bad.
If you have a child guitarist at your home, then it is your job to not only help then maintain their guitar but teach them these fundamentals as well.